Getting started: your first hour
The installer is done and the server is running. This page walks you through the first hour as the administrator: signing in, reading the dashboard, finishing the setup checklist, naming your panel, and locking down your own login.
Sign in for the first time
- Open
https://your-server:2087in your browser. Port 2087 is the administrator and reseller side. Customers use port 2083. - On the first visit, enter the one-time token the installer printed and choose the administrator's password. Lost the token? See Install.
- After that, the sign-in page is headed Sign in, with the line "Administrator and reseller sign-in. Customers sign in on the customer panel."
- Enter your Username and Password, then press Sign in. After 5 failed tries, sign-in pauses for 15 minutes.
If the page says Sign in with a passkey, you can use that instead once you have added one (see below). Forgot password? is on the same page.
Can't get in at all? Locked out? Get back in from SSH covers the recovery tool.
The dashboard
The dashboard opens with Welcome back and your username, with the server's CPU, cores, memory and operating system under it. Two buttons sit at the top right: Packages and Create account.
From top to bottom it shows:
- Alerts. A card titled "N things need a look" appears only when something is open. Each line has a kind label, a title and a Dismiss button. Some also have Fix.
- Finish setting up your server. One line with your progress and a Continue setup button. It goes away once every step is done.
- Health. "All systems healthy", or a list of what needs attention, with the running services counted by group.
- Counts. Accounts, Websites, MySQL databases, Mailboxes and SSL certificates.
- Resources, Services, Recent activity, Software and Tools (every admin page, grouped as the menu groups them).
Alerts
The dashboard shows the five worst alerts. See all alerts (or Alerts in the menu) opens the full list.
- Dismiss hides an alert until its problem changes, or until it is fixed and breaks again. Dismiss all does the same for every alert on the card.
- On the Alerts page, filter by Open, Dismissed or All, by kind, or search by domain, account or text. Tick alerts and use Dismiss or Bring back.
- Alerts cover mail, certificates, Malware Watch, disk, transfer, services and backups.
Essential setup
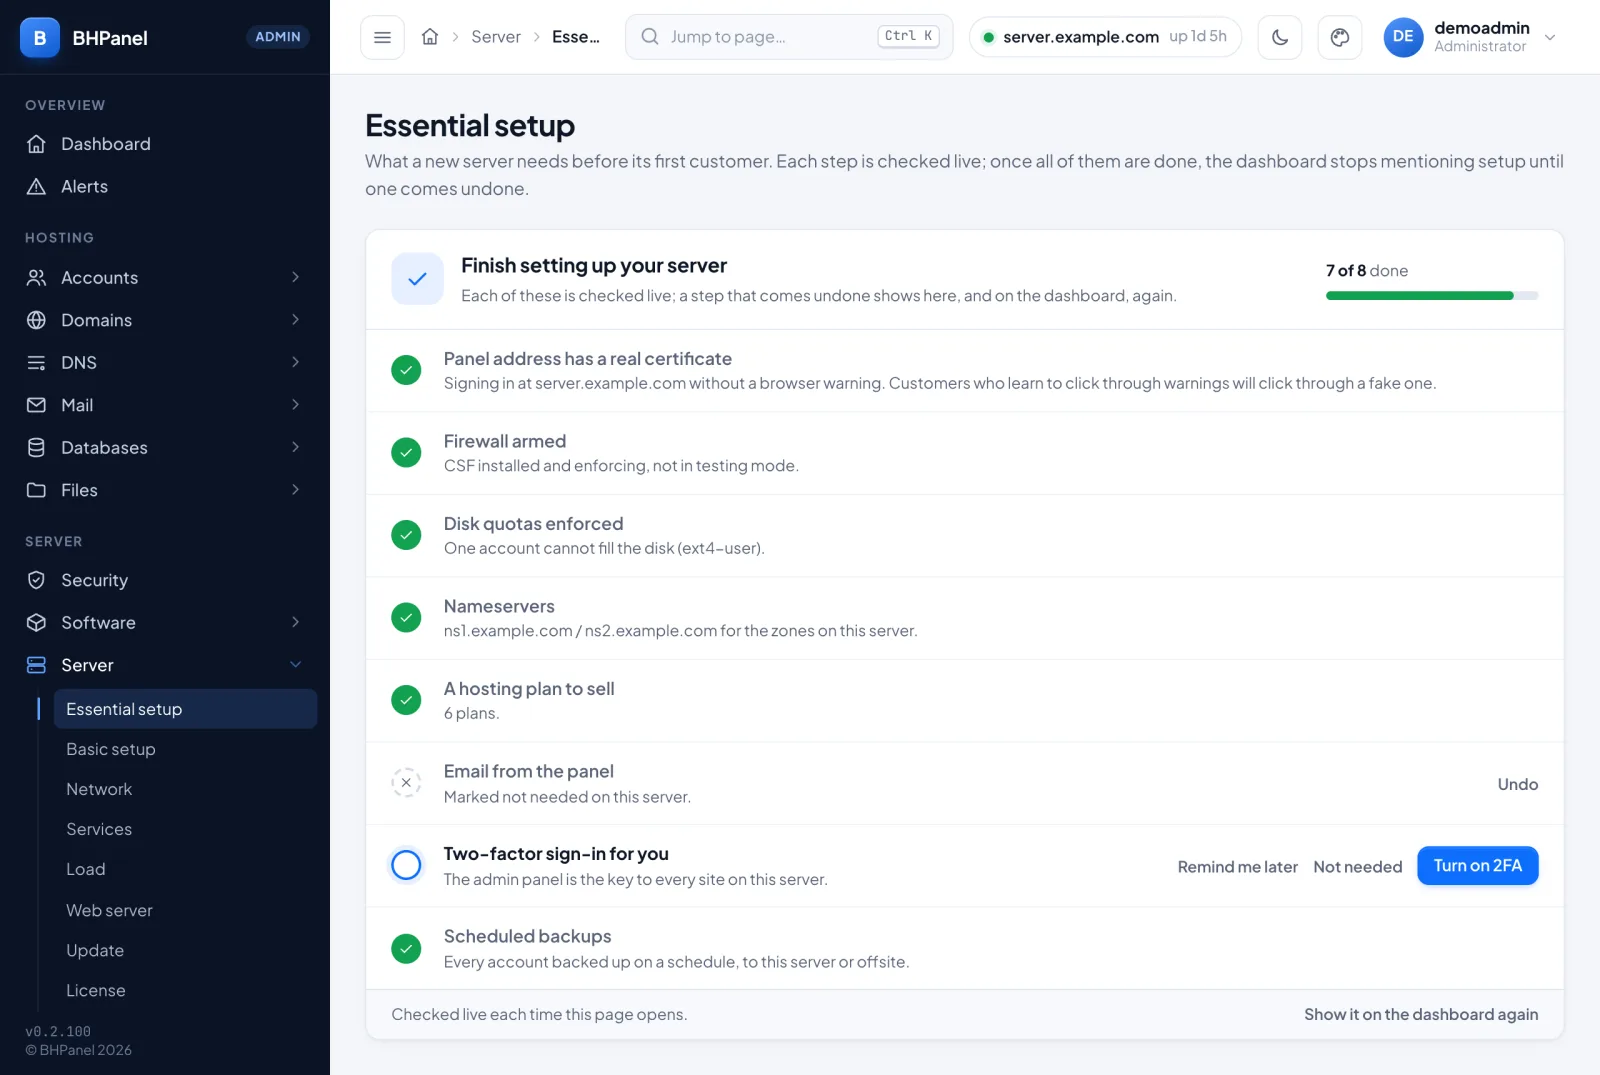
Open Server › Essential setup. This is what a new server needs before its first customer. Every step is checked live each time you open the page. If one comes undone later (for example the firewall goes back to testing mode), it shows again here and on the dashboard.
On each open step you can press Remind me later (hides it for 7 days), Not needed (it stops counting as open), or the action button. A step you marked can be reversed with Undo or Remind me now.
The steps:
- Panel address has a real certificate. Your panel needs a fully-qualified hostname and a trusted certificate, so nobody learns to click through browser warnings. Button: Get a certificate (Domains › SSL).
- Firewall armed. CSF must be installed and enforcing, not in testing mode. Button: Open the firewall. See Securing your server.
- Disk quotas enforced. One account cannot fill the disk. There is no button; this depends on the install (Install explains what to do if quotas cannot be enabled).
- Nameservers. Customers need two nameserver names to point their domains at this server. Button: Set nameservers (see below).
- A hosting plan to sell. Every account is created on a plan. Button: Create a plan (Accounts › Packages). See Plans and performance.
- Email from the panel. Needs a mail server installed and a contact address, so password-reset email and alerts can go out. Button: Set up email, which opens Basic setup.
- Two-factor sign-in for you. The admin panel is the key to every site on the server. Button: Turn on 2FA.
- Scheduled backups. Every account backed up on a schedule, to this server or offsite. Button: Open backups. See Backups.
When all steps are done or marked not needed, the page says "Server setup complete".
Basic setup
Open Server › Basic setup. Each card has its own Save button.
- Identity › Panel name. Shown in the sidebar, the browser tab and the sign-in page. Leave it blank to use the product's own name. A reseller can put their own name over it for their customers.
- Default colour for everyone. Pick a preset or Custom colour. Anyone can still choose their own from the palette menu in the top bar.
- Logo and favicon. PNG, JPEG, GIF, WebP or ICO, up to 256 KB. Use Upload, or Remove to go back to the built-in mark. SVG is not accepted.
- Server contact. Contact address is where the server writes when something needs a person, such as a disk filling or a certificate that could not be renewed. Sender name is the From: name, and Reply-to is where a reply goes.
- Upgrade link. Where a customer goes for a bigger plan, usually your billing system's upgrade page. Customers you sell to directly see a "Need more room?" card with this link.
- Password reset by email. Two boxes: Resellers and customers can reset by email, and Administrators can reset by email (two-step required). The link works once and expires after an hour. An administrator can only reset by email if two-step verification is on and an email address is set. Without a mail server installed, the card says so and the sign-in page tells people to ask you.
- Overselling disk. Allow selling more disk than the server holds. The card shows how much is sold against what the disk can back.
Basic setup has no hostname or nameserver fields. They live beside the thing they affect:
- Nameservers: DNS › DNS zones (the Nameservers card, fields NS1 and NS2). The addresses they answer at are set under Server › Network. See DNS.
- Panel hostname: Domains › SSL, beside the panel's own certificate. The Panel address has a real certificate step takes you there.
Edit profile: lock down your own login
Open the menu under your name (top bar) and choose Edit profile. The tabs are Panel login, Photo, Email address, Password, Two-factor and Passkeys.
- Panel login. Change your username and set an email address. This login signs in to the web panel only. It is not a shell account. An email address is also what lets you reset a forgotten password.
- Two-factor. Enter your current password and the code from your authenticator app, then press Turn on. Save the recovery codes somewhere off the server.
- Passkeys. Add a passkey so you can sign in with a fingerprint, face or device PIN. You confirm with your password (and a two-factor code if it is on) first, then name the passkey and press Add a passkey. A passkey counts as two-factor on its own. Turn passkeys on or off for each role under Server › Passkeys.
What next
- Install and Upgrade: what the installer did and how updates work.
- License: activate your license under Server › License.
- Securing your server: firewall, SSH keys, threat feeds, Malware Watch.
- Plans and performance: limits and sizing for your first plan.
- Backups: schedule backups and send them offsite.
- Then create your first account with Accounts › Create an account.